

[wd_asp id=2]
[wd_asp id=1]
0
$0.00
0 items

There are so many ways to UpCycle your clothes and your kid’s clothes. This can be a fun weekend project! Don’t be scared to try something new. You can also use this for science experiment credits for that homeschooling you have been doing and If you don’t like how it turns out, well you were going to donate it anyways!

Did you know there are different ways to “Bleach” your clothes? This could be a fun activity for the kiddos. Just be sure if you are letting them go full Nozzel then have them wear gloves and play clothes!

I’m sure some of you are saying That is so ugly! I’m telling you it is the “New Tye Dye.” One thing I always told my kids it doesn’t matter if I like it, as long as you wear it!
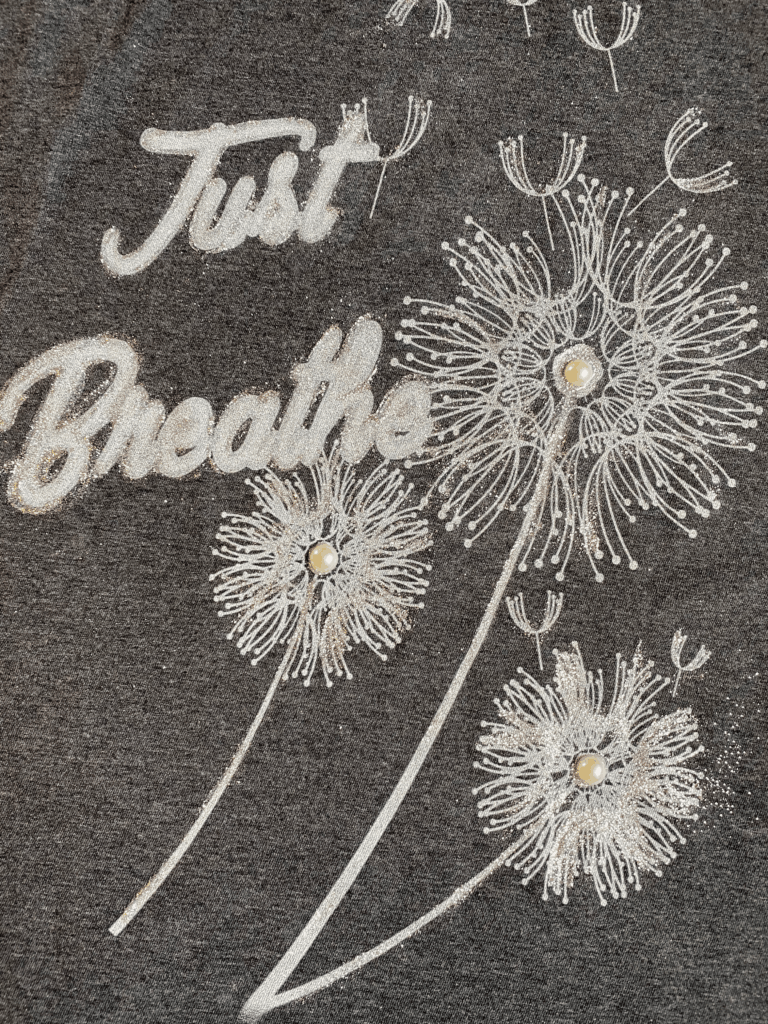
Let’s move on to another fun Upcycle! I had this tank top that was pretty old and worn. I wasn’t ready to end our relationship due to the fact it was so soft. I decided that I wanted to give it a fresh new look. I took it to Dirt Cheap Copies in Cottage Grove. (Also known as Carlton Press.) I picked out one of their many shirt designs. Currently, they have over 100! I printed on my tank top and brought it home. I could have stopped there because I really like it, but that isn’t me! Take a look below at the steps I took to give my plain grey tank and amazing shining uplift!
When I use glitter on clothes I like to use Recollections FINE glitter. I only use a little bit. This step takes patience. You use the glue and just paint it onto the tank where you want the glitter to go. You can do this with existing shirts. It’s a great way to give your daughter’s favorite princess rainbow unicorn shirt a fresh new look! Maybe your son wants some red glitter on his fire breathing dragon shirt! After I have let the glitter sit for about 10 minutes I then shake it outside! Keyword: OUTSIDE. (Funny how husbands don’t appreciate the fine things like glitter in the grout of their tile floor!) Next, take a dry paintbrush and lightly brush over the glitter. If you see a spot that didn’t’ get as much glitter as you would have liked, just repaint that area and dump some glitter on it! Now I don’t like to waist glitter so when I brush the glitter off I actually have a piece of paper underneath and then take the extra and pour into my existing mixture of glitter Tupperware container. When I have projects that don’t need a specific color of glitter I use this beautiful mixture! After you finished waiting another 10 mins. Repeat. Now your shirt should be ready to go! I like to wait an hour to really let the glue dry then I put the shirt into the dryer for 10 mins. This really seals the glitter in. If you go straight to the wash you will lose more glitter if you don’t. I know my nieces love the “Chunky Glitter.” I will save you time. I have tried this with it and it doesn’t stand the glitter clothing test at all!
For most kids, the jeans/pants they are wearing at the end of the school year are not going to fit the beginning of the next fall! Kids just continue to grow! So You keep their jeans in their closet and then come the end of August you realize they don’t fit and have to put them in the donate pile. Let’s change that thinking! At the end of the school year BEFORE the kids convince you they have no summer clothes, why not Upcycle some!

This is so easy and really your teens could do it with just a little supervision. Cut the length of the pants you want. The ones shown above are actually my jeans. (I saw something like this online for sale around $80 I refuse to pay for pants that come with rips in them!) I took the scissor edges and made some cuts. The fringe detail and lace are from a summer shirt that I never really wore so I decided to give it new life too. I don’t like to sew too much but I did sew on the fringe. You can use the same fabric glue as shown above then do a few hand stitches for extra security if you are not a sewer. I then painted with Puffy fabric paint that you can get for around .60 cents a tube! The transformation took me about 30 mins and I love my new “Hippie Capris.” Really you can do anything your imagination thinks of, or that Pinterest inspires you too!
This adorable decoration is great for all ages and affordable too!
This craft doesn’t take a long time to make, but there is downtime while waiting for the paint to dry. During this time may I suggest a nice glass of Rose pairs well with Peanut Butter and Jelly. Always a classic.
Here we go.
Step by step photos and of course you can change to any type of designs and color to suit your decorative style.
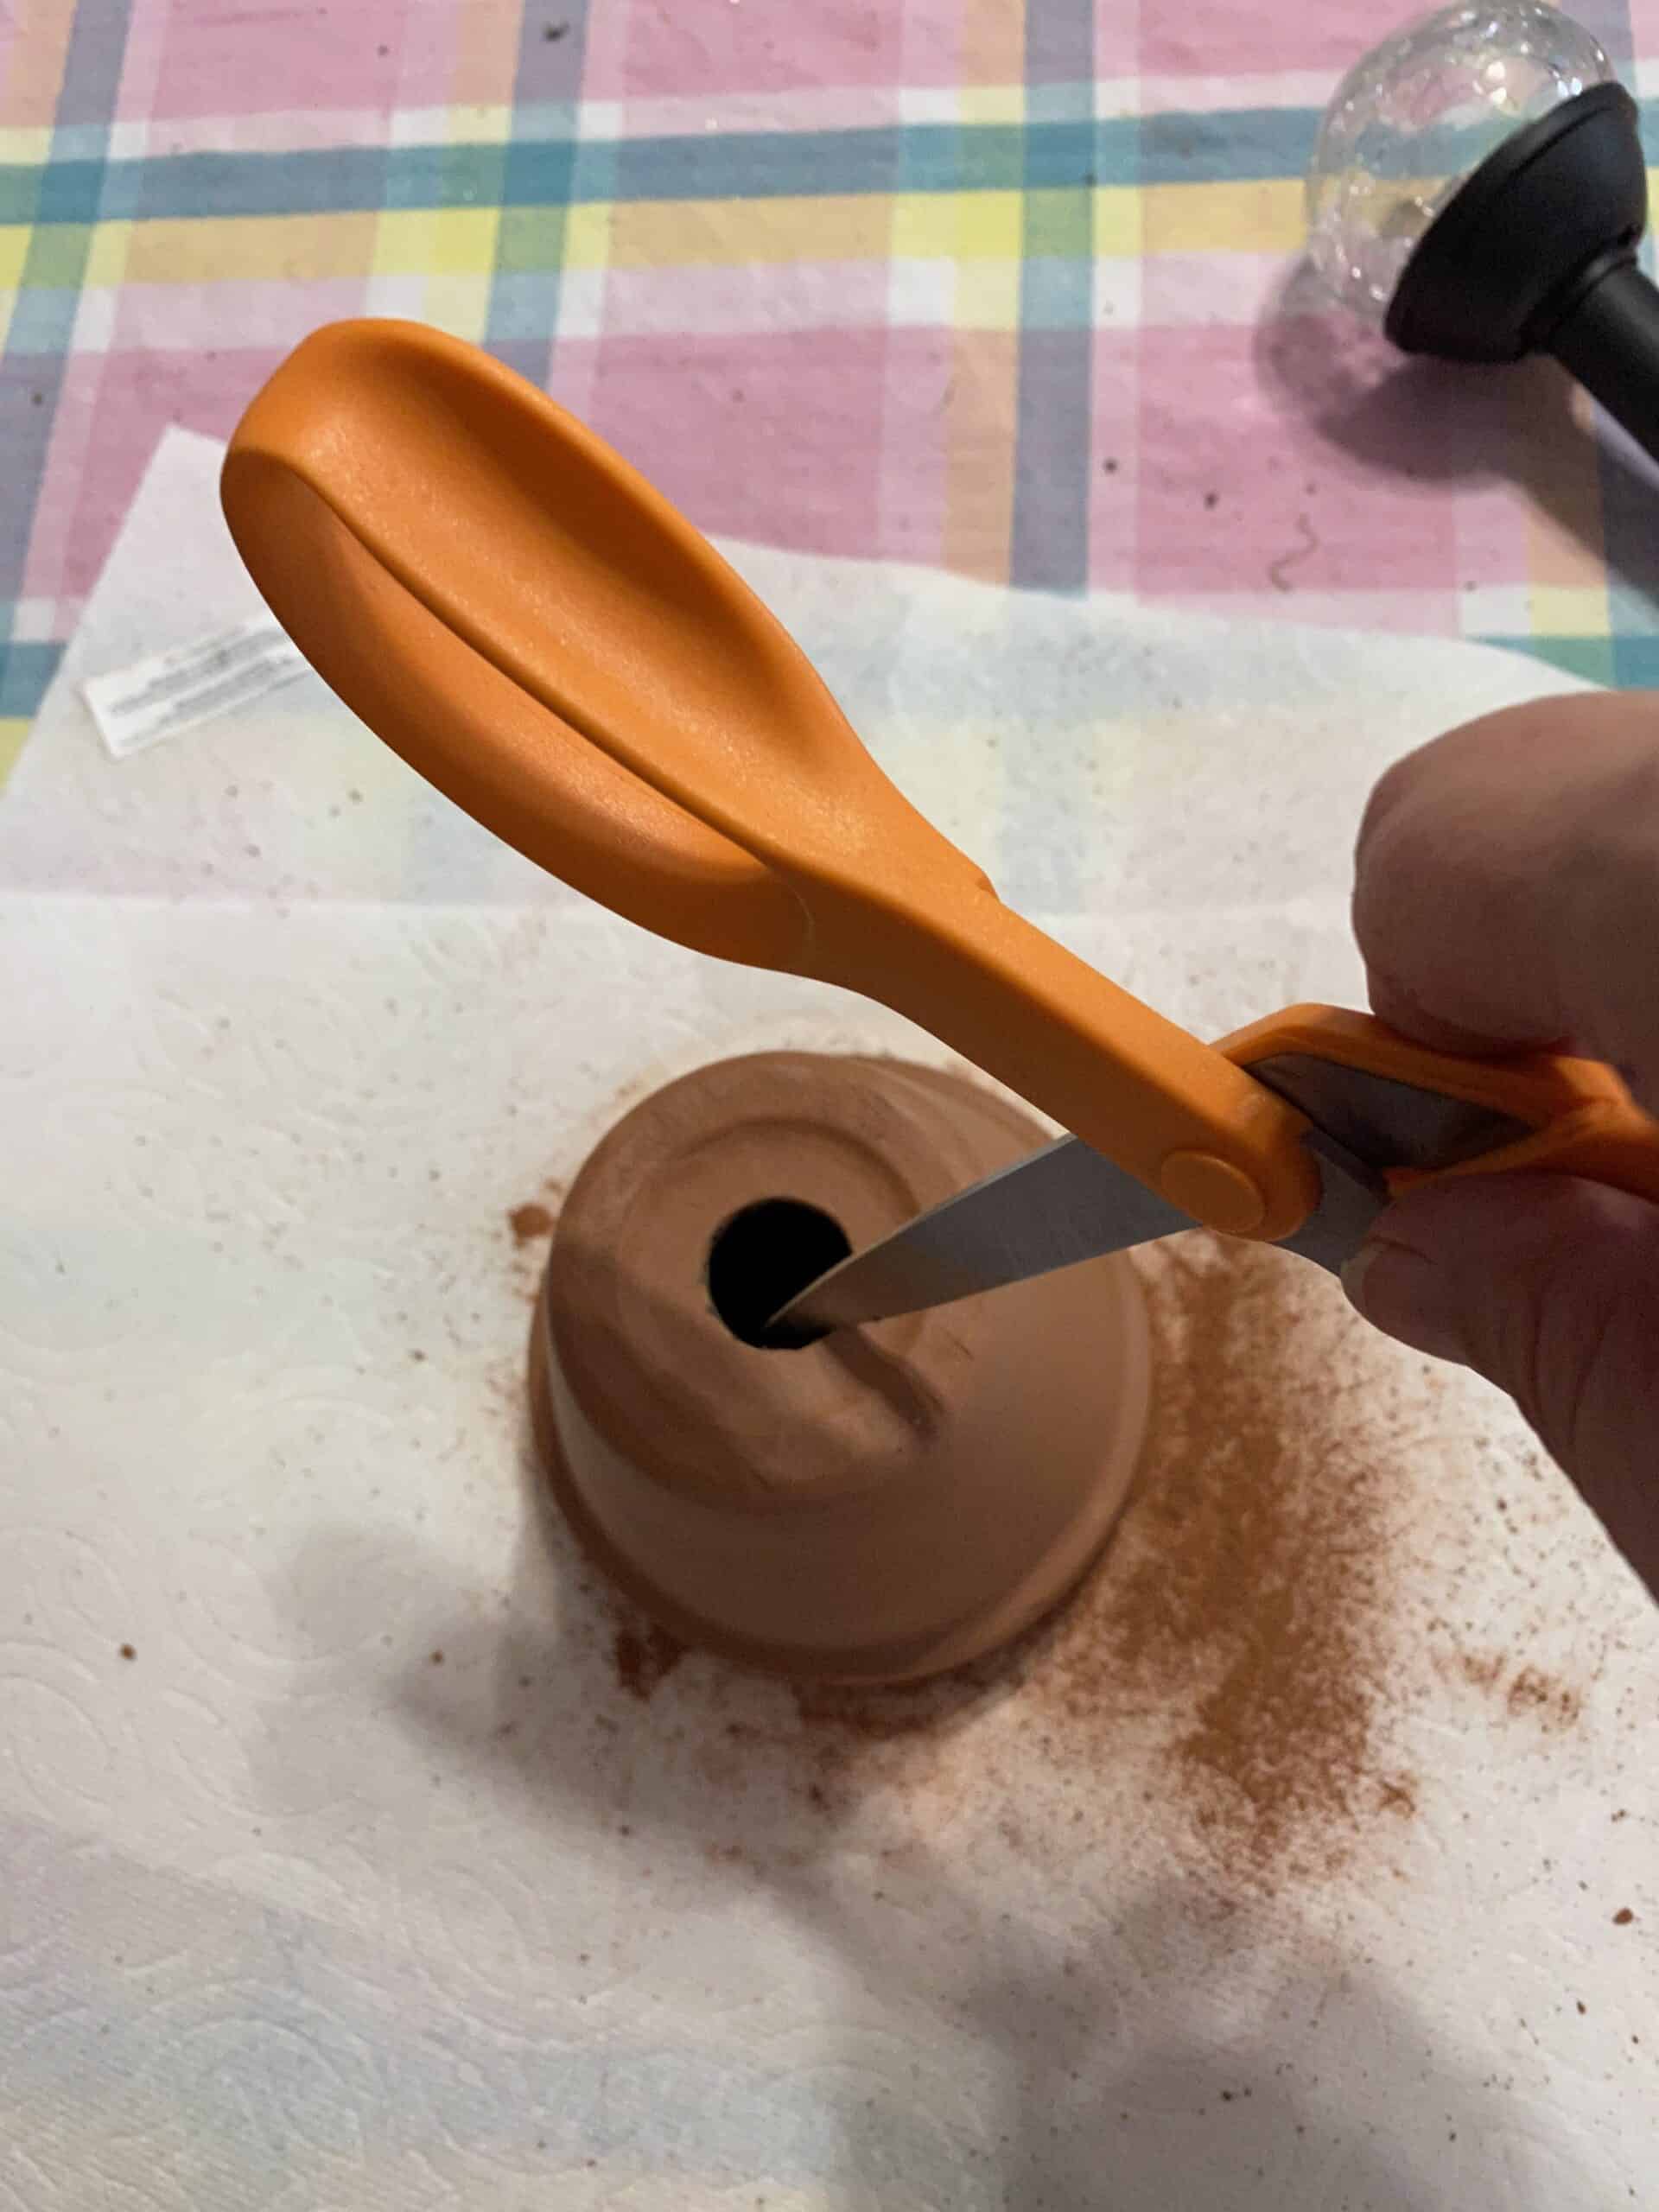 Step 1. Most openings in the bottom of the pot will be too small. Clay pots are really easy to enlarge the size of the hole so your light will fit. Take scissors and just keep going around and around. BE CAREFUL! This is a bit messy and should be done by an adult. Keep measuring with your light base until it fits in firmly.
 Step 2. Spray paint your pot white. You can also put your kiddo in some old clothes and let them go at it with a foam paintbrush and some white paint. I use just basic acrylic craft paint. We are sealing it so you don’t have to use expensive paints for this part.
 Step 4. Spray with your primary color. I used a pretty blue. Once again if it is time to make lunch or you need to sneak away for that glass of wine. Leave your kiddo for a second with a foam brush and some blue paint. If you do let your little one be the artist be sure to smooth it out before it starts to dry.
 Step 5. Now that lunch is over, it’s time to peel off the stickers. I know there are all sorts of craft tools for this process but being a sucker I have bought them all and I find that my fingernails work the best!
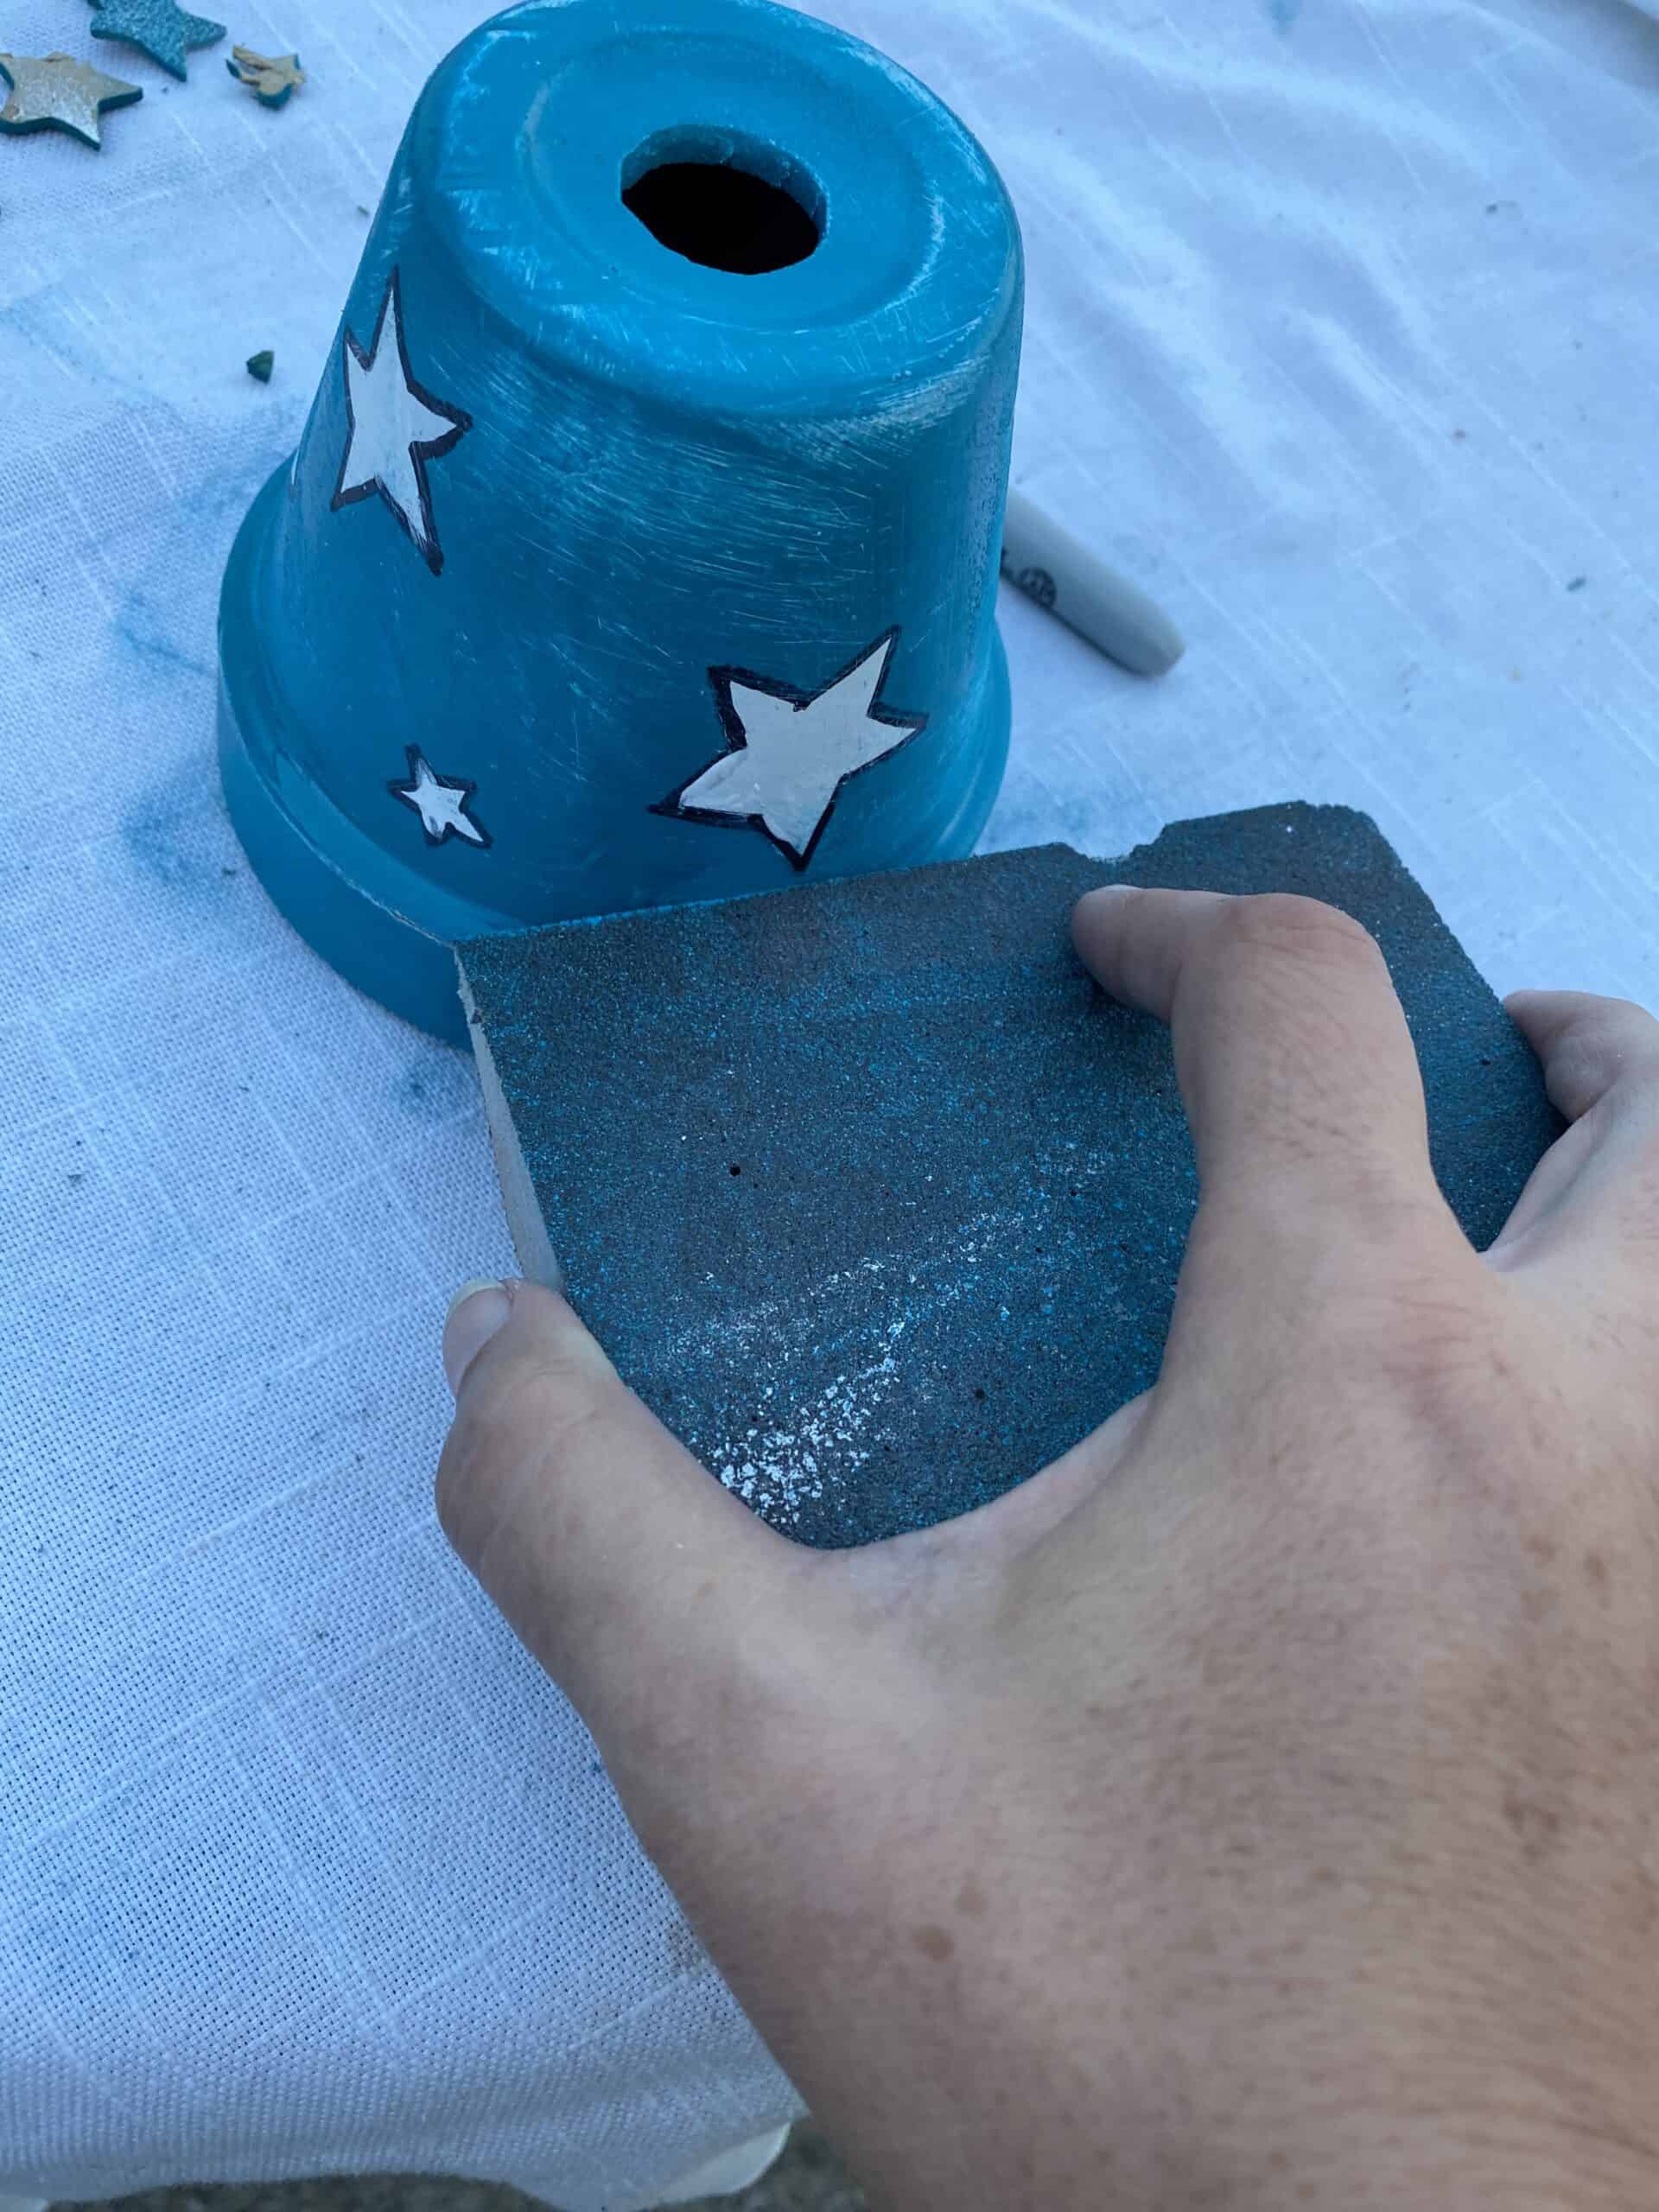
Step 6. This part is optional: I took a black sharpie and outlined my stars. My personal preference to have them pop! Then I sanded the pot to give it a bit of a “rustic look”. 
Step 7. Spray with sealer. I really like Krylon’s ColorMaster Crystal Clear Sealer. You can find anywhere they sell spray paint.
 Step 8. Now that Nappy time is over it’s time to decorate! My personal favorite part. I choose some white shinny ribbon I already had in my collection. When you put your bit of glue on the end then put a piece of Blue paint tape preferably. (I didn’t realize I was out of this tape so had to use scotch tape) to secure the spot. Then simply glue all the way around the edge. Tape the end piece over the start piece. After dry take off the tape. Next, I choose a pretty red and made a bow – glued that on and added a star for fun! Put light in and set on the table. Walla! Easy Peasy!

Thank you so much for following Carmen’s Craft Blog. See you in the near future with another fun craft! Stay Safe and Happy Crafting! ~Carmen
Frank Cheyne Papé, who generally signed himself Frank C. Papé (b. Camberwell, July 4, 1878 – d. Bedford, May 5, 1972) was an English artist and book illustrator. He studied at The Slade School of Fine Art, completing his studies circa 1902-04.Papé was married to a fellow Slade student, illustrator Alice Stringer. (Source: Wikipedia)

Sir Joshua Reynolds (16 July 1723 – 23 February 1792) was an English painter, specializing in portraits. John Russell said he was one of the major European painters of the 18th century. He promoted the “Grand Style” in painting which depended on idealization of the imperfect. He was a founder and first president of the Royal Academy of Arts, and was knighted by George III in 1769.
Ida Rentoul Outhwaite, also known as Ida Sherbourne Rentouland Ida Sherbourne Outhwaite(9 June 1888 – 25 June 1960), was an Australian illustrator of children’s books. Her work mostly depicted fairies.
Ida was born in Carlton, Victoria, the youngest child of four and second daughter of the Rev. Dr. John Laurence Rentoul, an Irish-born Presbyterian minister and academic, and his wife Annie Isobel (née Rattray). At the time of her birth Outhwaite’s father was a professor at Ormond College, University of Melbourne, and later moderator-general of his church for 1912-14, and when the World War I broke out, chaplain-general of the Australian military forces.She was educated at Presbyterian Ladies’ College, Melbourne.
(Source: Wikipedia)

Léon Bakst(Russian: Леон (Лев) Николаевич Бакст, Leon (Lev) Nikolaevich Bakst) – born as Leyb-Khaim Izrailevich(later Samoylovich) Rosenberg, Лейб-Хаим Израилевич (Самойлович) Розенберг (27 January (8 February) 1866 – 28 December 1924) was a Russian painter and scene and costume designer. He was a member of the Sergei Diaghilev circle and the Ballets Russes, for which he designed exotic, richly colored sets and costumes. (Source: Wikipedia)
See also http://www.vam.ac.uk/content/articles/b/biography-of-leon-bakst/

Conrad Gessner (26 March 1516 – 13 December 1565) was a Swiss physician, naturalist, bibliographer, and philologist. Born into a poor family in Zürich, Switzerland, his father and teachers quickly realised his talents and supported him through university, where he studied classical languages, theology and medicine. He became Zürich’s City Physician, but was able to spend much of his time on collecting, research and writing. Gessner compiled monumental works on bibliography (Bibliotheca universalis 1545–1549) and zoology (Historiae animalium 1551–1558) and was working on a major botanical text at the time of his death from plague at the age of 49. He is regarded as the father of modern scientific bibliography, zoology and botany. He was frequently the first to describe a species of plant or animal in Europe, such as the tulip in 1559. A number of plants and animals have been named after him. (Source: Wikipedia)

Gustave Moreau (6 April 1826 – 18 April 1898) was a major figure in French Symbolist painting whose main emphasis was the illustration of biblical and mythological figures. As a painter, Moreau appealed to the imaginations of some Symbolist writers and artists. He is recognized for his works that are influenced by the Italian Renaissance and exoticism. His art work was preserved in Paris at the Musée Gustave Moreau.
Oedipus and the Sphinx, one of his first Symbolist paintings, was exhibited at the Salon of 1864. Moreau quickly gained a reputation for eccentricity. One commentator said Moreau’s work was “like a pastiche of Mantegna created by a German student who relaxes from his painting by reading Schopenhauer.” The painting currently resides in the permanent collection at the New York Metropolitan Museum of Art.
Moreau became a professor at Paris’ École des Beaux-Arts in October 1891. Among his many students were fauvist painters Henri Matisse and Georges Rouault. Jules Flandrin, Theodor Pallady and Léon Printemps also studied with Moreau.
(Source: Wikipedia)

Frederic Leighton, 1st Baron Leighton, PRA (3 December 1830 – 25 January 1896), known as Sir Frederic Leighton between 1878 and 1896, was an English painter and sculptor. His works depicted historical, biblical, and classical subject matter. Leighton was bearer of the shortest-lived peerage in history; after only one day his hereditary peerage became extinct upon his death.
He was educated at University College School, London. He then received his artistic training on the European continent, first from Eduard von Steinle and then from Giovanni Costa.
(Source: Wikipedia)

Carl Christian Heinrich Nahl (October 18, 1818 – March 1, 1878), later known as Charles Nahl, and sometimes Karl Nahl, Charles Christian Nahl or Charles C. Nahl, was a German-born painter who is called California’s first significant artist.
e was the son of Georg Valentin Friedrich Nahl (1791–1857) and Henriette (Weickh) Nahl (1796–1863). His parents divorced in 1826. He came from a long line of artists and sculptors. His great-grandfather was Johann August Nahl, the German sculptor and stuccist.
Nahl was trained at the Cassel Academy.
(Source: Wikipedia)