

[wd_asp id=2]
[wd_asp id=1]
0
$0.00
0 items
Summer is here and it’s time to start decorating with RED, WHITE & BLUE!

I’ve always loved decorating for EVERY holiday. The 4th of July is really fun to decorate because you spend a lot of time outside and I love YARD ART! For you Pinterest addicts I know you have seen this wreath before and probably have it saved in one of your boards. I did too. I have a board titled, “To Make Soon.” I laugh every time I save something to this board. Ever since Covid-19 began I decided to look at this board and try to make something from it as much as I can. Well, I am happy to say I can now scratch Clothespin Wreath of my list!
(If you have seen my other blogs you can see I am trying to see which way to blog “how-to” crafts are the easiest for you guys! Feel free to comment and let me know which format you like the best. I want all my “how-tos” to be stress-free and easy for all levels of crafters. )

Photo 1. shows you that you need to clip the wire wreath in 1/2. Photo 2. you will see you now have 2 separate rings. (looks like a snowman project will be in order later this year.) Photo 3. shows you that you need to cut off any extra hanging wire pieces. Photo 4. This is the fun part. MATH! This is where your littles can help you figure out how many Clothespins you will need.

Now that you have counted how many Clothespins it will take to make your wreath separate them in 1/2 and then take some of them and move to make the “blue” section. I used 1 section + 5 so 15. Shown in Photo 6. Also, in Photo 6 you will see that they are separated from the others in that row. That is because we are going to spray that entire row with white paint but want to keep the blue ones separate so we don’t have to move them later. I put a large piece of wrapping paper in between the two sections so I could spray both colors at the same time and have less wait time. Also, you can see I put the clothespins on a large box I had in my recycle pile for easy painting. Now if you would like to torture your kiddo you can have them paint each one by hand. Maybe you need time to sneak off and have a nice glass of Reisling or a few Fireball shots! (I don’t judge on this blog, you do what you need to do to survive!)

Now the fun step! Photo 9 shows star stickers on the white clothespins. This can be a reward for your little one after hand-painting all the clothespins or leaving you alone while you secretly finish off your 2nd glass of wine. Remember: The only section we are painting blue is the section shown above in Photo 6. Once Paint is dry peel off the star stickers. (Photo 10.) How cute is that?
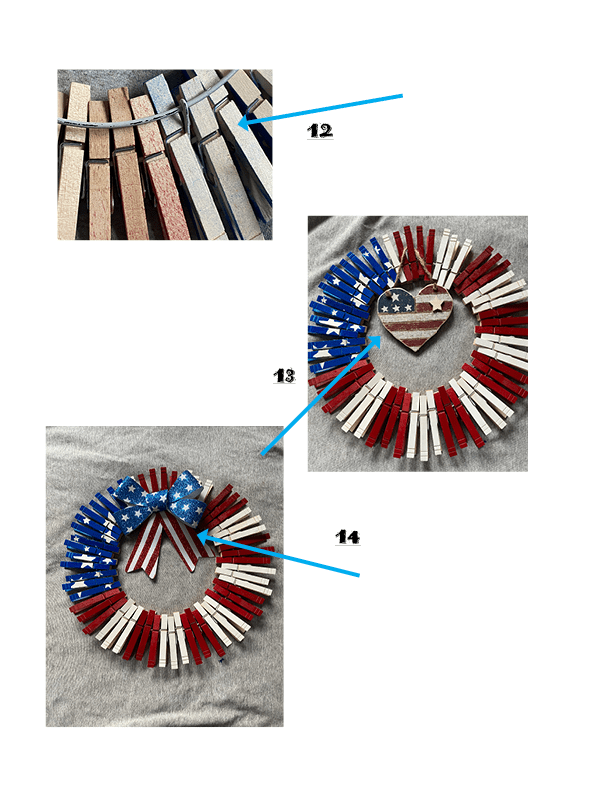
As you can see in Photo 11 above, you just start clipping your clothespins in a pattern. I found that 3 worked best. Of course, the kiddos will be a great help at this part! In Photo 12. I flipped the wreath over so you could see the backside. You can see that the clothespins are at different lengths and the pins are clipped only on the first wire row which is the most inner wire, then the pins lay on top of the outer row of the wireframe. My Wireframe only had two rows after we had cut it. Now we get to decorate! Add a Garnish! In Photo 13. I show a country rustic heart, and in Photo 14 a fun Sparkly Bow! Can you guess which one I choose for mine? This is really a simple craft to do and you can color the clothespins for any holiday or theme you choose!
